Easy Mummy Cake With Cherry Jam Filling Recipe
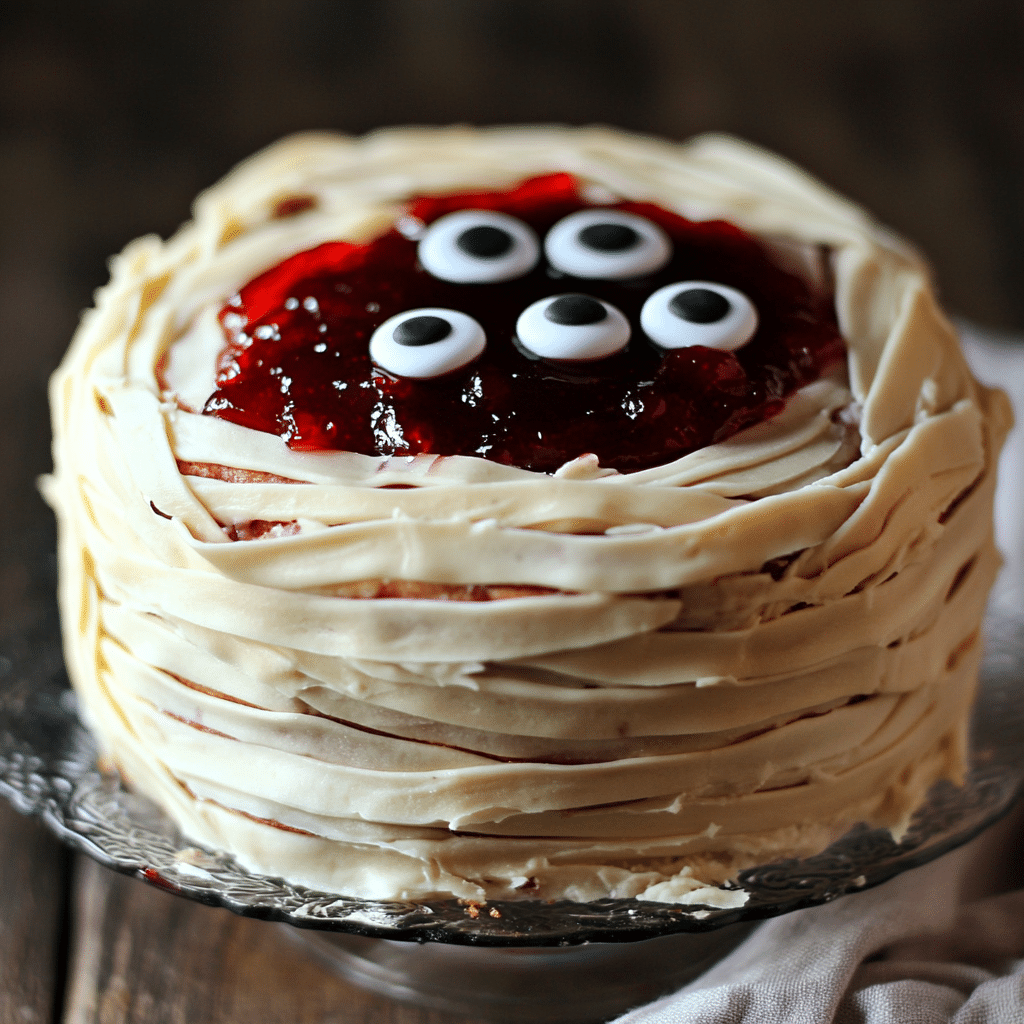
Create a spooky treat with this easy Mummy Cake With Cherry Jam Filling recipe, perfect for Halloween gatherings and sweet celebrations. This delightful cake blends moist layers with a luscious cherry jam center, all wrapped in a whimsical mummy design that is sure to impress both kids and adults. Whether you’re planning a festive party or simply craving a fun and delicious dessert, this recipe makes creating a memorable and tasty mummy-themed cake a breeze.
Why You’ll Love This Recipe
- Spooky and Fun Presentation: Perfectly shaped like a mummy, this cake brings a playful vibe to any holiday table.
- Delicious Cherry Jam Filling: The sweet and tangy cherry jam inside adds a juicy surprise between the soft cake layers.
- Simple Ingredients: Using common pantry staples, you can easily whip this up without hunting for hard-to-find items.
- Kid-Friendly Activity: Decorating the mummy is a fun project for kids and adults alike, making baking a hands-on experience.
- Versatile for Any Occasion: While ideal for Halloween, this cake can be adapted for birthdays or themed parties with ease.
Ingredients You’ll Need
Gathering the essential ingredients for the Mummy Cake With Cherry Jam Filling is quick and straightforward. Each component contributes to the cake’s texture, flavor, and the eye-catching design that makes this dessert unforgettable.
- All-Purpose Flour: The foundation that gives the cake structure and softness.
- Baking Powder: Ensures the cake rises beautifully and stays fluffy.
- Granulated Sugar: Adds just the right amount of sweetness.
- Unsalted Butter: Provides richness and a tender crumb.
- Eggs: Bind the ingredients and add moisture for a perfectly moist cake.
- Vanilla Extract: Enhances the overall flavor with a warm, inviting aroma.
- Cherry Jam: The star filling, delivering bursts of fruity sweetness between cake layers.
- Powdered Sugar: For dusting and smoothing the mummy wrap effect.
- White Icing or Frosting: Used to create the mummy’s bandages and stick the decor together beautifully.
- Chocolate Chips or Candies: Perfect for forming the mummy’s spooky eyes.
Variations for Mummy Cake With Cherry Jam Filling
One of the best things about this recipe is how easy it is to customize. Whether you want to adapt for dietary preferences, change flavors, or add your own creative twist, you can make this mummy cake your own.
- Flavor Swap: Replace cherry jam with raspberry or strawberry jam for a different fruity touch.
- Vegan Option: Use plant-based butter and egg substitutes to make this cake entirely vegan.
- Gluten-Free: Swap regular flour with a gluten-free blend that works well for cakes.
- Chocolate Twist: Add cocoa powder to the batter for a rich chocolate base that pairs amazingly with cherry.
- Spice It Up: Incorporate cinnamon or pumpkin spice into the batter for an autumnal vibe.

How to Make Mummy Cake With Cherry Jam Filling
Step 1: Prepare Your Cake Batter
Start by preheating your oven and greasing your cake pans. In a large bowl, cream together the unsalted butter and granulated sugar until light and fluffy. Add the eggs one at a time, blending well after each addition. Stir in the vanilla extract. In a separate bowl, whisk together the all-purpose flour and baking powder. Gradually add the dry ingredients to the wet mixture, stirring gently until the batter is smooth and well blended.
Step 2: Bake Your Cake Layers
Divide the batter evenly between your prepared cake pans. Place them in the oven and bake until a toothpick inserted into the center comes out clean, usually around 25 to 30 minutes. Once done, allow the layers to cool completely on wire racks before assembling.
Step 3: Add the Cherry Jam Filling
Once the cake layers are cool, spread a generous layer of cherry jam over one layer. This sweet, tart filling adds a delicious contrast to the tender cake. Carefully place the second layer on top, pressing gently to secure.
Step 4: Frost and Decorate the Mummy
Using white icing or frosting, cover the entire cake smoothly. Then, pipe strips of frosting across the cake to mimic mummy bandages, leaving gaps here and there for a realistic effect. Finish by pressing chocolate chips or candies onto the cake for the spooky mummy eyes.
Step 5: Chill and Serve
Refrigerate your mummy cake for at least 30 minutes to allow the frosting to set properly. This chilling step helps the cake hold its shape and makes slicing easier. When ready, cut slices to reveal the beautiful cherry jam filling inside.
Pro Tips for Making Mummy Cake With Cherry Jam Filling
- Use Room Temperature Ingredients: Helps create a smooth batter and even baking.
- Don’t Overmix: Stir until just combined to avoid tough cake layers.
- Cool Completely Before Frosting: Prevents the frosting from melting and sliding off.
- Apply Thin Layers: Thin strips of frosting give the best mummy bandage effect.
- Choose Quality Cherry Jam: A high-quality jam adds richer, more vibrant flavor.
How to Serve Mummy Cake With Cherry Jam Filling
Garnishes
Add an extra spooky touch with edible glitter, colored sprinkles, or a dusting of powdered sugar shaped like spiderwebs. Fresh cherries or mint leaves on the side also brighten the presentation beautifully.
Side Dishes
Pair this cake with a scoop of vanilla or cinnamon ice cream for a creamy contrast that complements the cherry flavor wonderfully. Warm apple cider or grape juice make festive, kid-friendly drink choices to accompany each slice.
Creative Ways to Present
Display your mummy cake on a themed platter decorated with mini pumpkins, faux spider webs, or autumn leaves. You can also cut the cake into mini mummy cupcakes for easier serving at parties or use colored frosting to create different mummy expressions for added fun.
Make Ahead and Storage
Storing Leftovers
Keep any leftover mummy cake covered tightly with plastic wrap or stored in an airtight container in the refrigerator. It will stay fresh for up to 3-4 days, preserving the moist texture and jam filling perfectly.
Freezing
To freeze, wrap individual slices or the whole cake well with plastic wrap and then place in a freezer-safe bag or container. It can be frozen for up to 2 months. Thaw in the fridge overnight before serving.
Reheating
If you prefer your cake slightly warm, reheat slices gently in the microwave for 15-20 seconds. Avoid overheating, as it can affect the texture and cause the frosting to melt undesirably.
FAQs
Can I use other fruit jams for the filling?
Absolutely! Raspberry, strawberry, or even apricot jams work wonderfully as alternatives to cherry jam in this mummy cake.
How do I make the mummy design neat and clean?
Use a piping bag with a small round tip to create even and thin frosting strips. Applying the frosting in layers and allowing them to set slightly helps achieve a tidy look.
Is this recipe suitable for children to help make?
Yes! Decorating the mummy cake is a fun activity for kids. Just supervise when using the oven during baking.
Can I make this cake vegan or gluten-free?
Definitely! Use plant-based ingredients and gluten-free flour blends to adapt the recipe for your dietary needs.
What is the best way to store the decorated cake before serving?
Store the decorated mummy cake in the refrigerator covered well to keep the frosting and jam fresh until you’re ready to serve.
Final Thoughts
Creating a Mummy Cake With Cherry Jam Filling is a delightful way to bring fun and flavor to any celebration. This recipe strikes the perfect balance between being simple to make and visually striking, ensuring your spooky treat steals the spotlight. Give it a try and watch your friends and family’s faces light up with every bite!