How to Make the Perfect Spider’s Nest Cake
If you are looking to wow your guests or simply treat yourself to something extraordinary, the Spider’s Nest Cake is a must-try. This visually stunning dessert mimics the intricate design of a spider’s web delicately draped over a rich, creamy cake that combines textures and flavors perfectly. Whether for a special occasion or a fun baking experiment, the Spider’s Nest Cake delivers both a unique aesthetic and a delicious taste that will have everyone asking for seconds.
Why You’ll Love This Recipe
- Striking Visual Appeal: The spider’s web design creates a conversation-starting centerpiece for any dessert table.
- Rich and Creamy Texture: Layers of luscious filling complement the soft cake base for a melt-in-your-mouth experience.
- Simple Ingredients, Big Impact: Uses easy-to-find staples that come together to create a gourmet treat.
- Perfect for Any Occasion: Whether a holiday or casual get-together, this cake adds a bit of fun and elegance.
- Customizable Flavor Profile: You can easily adapt this recipe to suit different tastes and dietary preferences.
Ingredients You’ll Need
Getting this Spider’s Nest Cake right starts with a handful of essential ingredients, each playing a crucial role in delivering the perfect flavor and texture combination. From creamy fillings to the delicate strands of the nest, every component counts.
- All-purpose flour: The foundation for a tender yet sturdy cake base that holds the structure well.
- Sugar: Adds sweetness and is key for a golden, moist crumb.
- Baking powder: Helps the cake rise for that light, airy texture.
- Vegetable oil: Keeps the cake moist without overpowering the flavors.
- Milk or plant-based milk: Enhances softness and binds ingredients seamlessly.
- Vanilla extract: Boosts flavor with warm, sweet notes that complement all layers.
- Shredded mozzarella cheese (vegetal): Adds a mild, creamy undertone in the filling, giving smooth richness.
- Heavy cream or coconut cream: Whipped to make the creamy spider nest strands.
- Sugar powder: For sweetening and stabilizing the nest decoration.
- Cocoa powder or melted chocolate: Used to tint the spider’s web strands, adding contrast and flavor.
- Plant-based texture solution (pectin or agar): To stabilize whipped cream and maintain the delicate nest form.
Variations for Spider’s Nest Cake
Feel free to get creative with this Spider’s Nest Cake recipe! It’s simple to customize based on your preferences, dietary needs, or whatever ingredients you have on hand. Here are some fun variations to experiment with.
- Chocolate Lover’s Twist: Add melted dark chocolate to the cake batter for a richer base with an intensified cocoa flavor.
- Fruit-Filled Center: Incorporate raspberry or strawberry preserves between layers for a tangy burst that cuts through the creaminess.
- Nutty Delight: Add finely chopped roasted nuts like almonds or pecans to the batter or garnish the nest for added crunch.
- Vegan Adaptation: Use plant-based milk, coconut cream, and a plant-based whipped topping to keep it completely vegan-friendly.
- Spiced Version: Introduce cinnamon or cardamom into the cake batter to give it a cozy warmth perfect for cooler seasons.

How to Make Spider’s Nest Cake
Step 1: Prepare the Cake Batter
Begin by preheating your oven to 350°F (175°C). In a large mixing bowl, combine the all-purpose flour, sugar, and baking powder. In a separate bowl, whisk together the vegetable oil, milk, and vanilla extract. Gradually add the wet ingredients into the dry, stirring gently until just combined for a smooth batter without overmixing.
Step 2: Bake the Cake Layers
Pour the batter evenly into two round cake pans lined with parchment paper. Bake for about 25 to 30 minutes or until a toothpick inserted in the center comes out clean. Once baked, let the cakes cool completely to ensure they hold shape when assembled.
Step 3: Prepare the Cream Filling
Whip the heavy cream or coconut cream with powdered sugar and a splash of vanilla extract until stiff peaks form. Gently fold in shredded mozzarella cheese (vegetal) to add richness and smoothness to the filling. You can add a small amount of the plant-based texture solution to stabilize the mixture if desired.
Step 4: Assemble the Cake
Place one cake layer on your serving plate and spread half of the cream filling evenly over the surface. Top with the second cake layer and cover the entire cake with the remaining cream, smoothing out the sides and top.
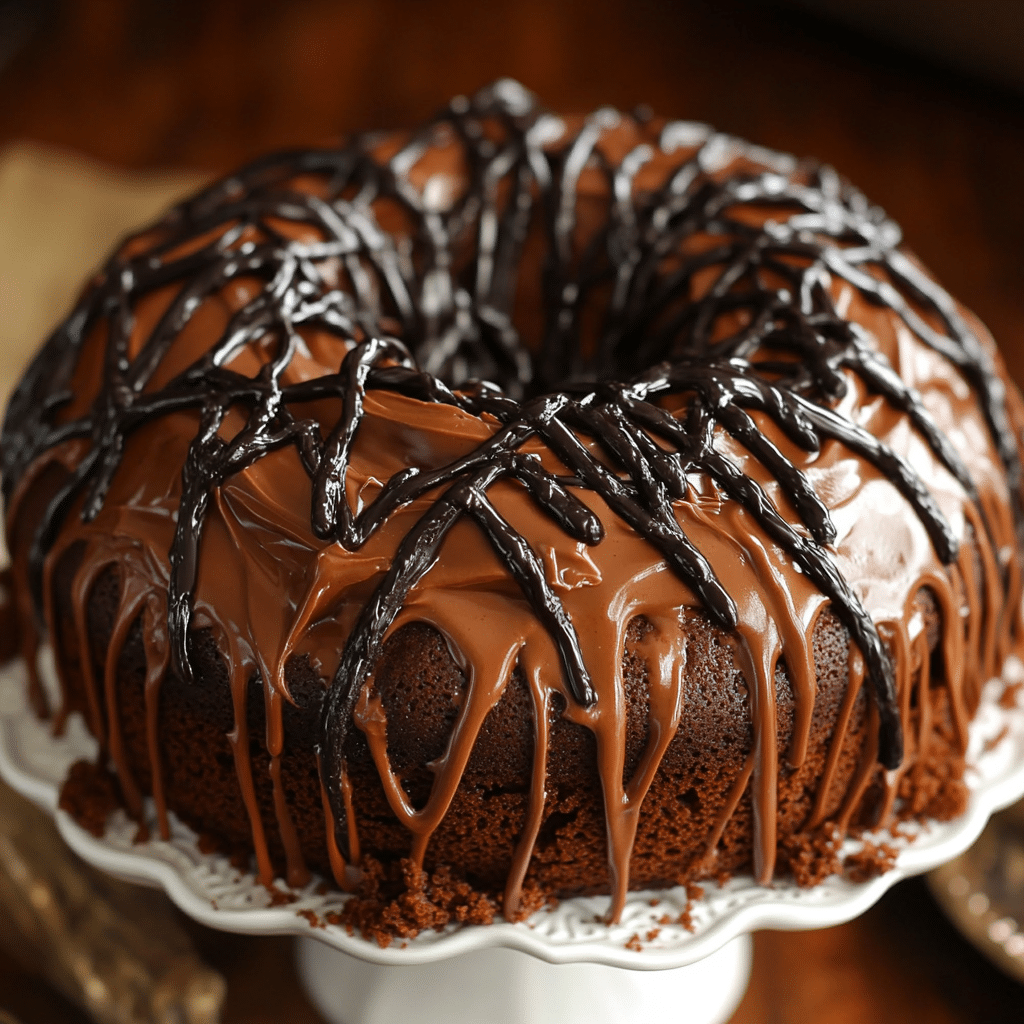
Step 5: Create the Spider’s Nest Decoration
To make the spider’s web strands, tint a portion of your whipped cream with cocoa powder or melted chocolate. Using a piping bag fitted with a thin round tip, pipe delicate circular webs on the top of the cake, overlapping concentric circles and carefully adding “spokes” radiating outward. Allow the strands to set slightly to hold their shape and bring that signature spider’s nest look to life.
Pro Tips for Making Spider’s Nest Cake
- Room Temperature Ingredients: Ensure all ingredients like eggs and milk are at room temperature for better batter consistency.
- Don’t Overmix Batter: Mix just until combined to keep the cake light and fluffy.
- Use Fresh Dairy: Fresh cream and cheese yield the best texture and flavor in the filling.
- Chill Before Decorating: Cooling the cake well before piping the nest helps the decoration hold firm.
- Practice the Web Design: Try practicing the spider’s web technique on parchment paper first to build confidence.
How to Serve Spider’s Nest Cake
Garnishes
Edible flowers, finely chopped toasted nuts, or a dusting of powdered sugar make beautiful garnishes that elevate the cake’s appearance and add subtle texture contrasts.
Side Dishes
Pair the Spider’s Nest Cake with a scoop of fruit sorbet or freshly sliced seasonal fruits like berries or kiwi to balance its richness with refreshing flavors.
Creative Ways to Present
Serve the cake on a decorative platter surrounded by small piles of fake spider webs (for a themed party) or arrange thin chocolate shards radiating from the nest to mimic branches for a dramatic effect.
Make Ahead and Storage
Storing Leftovers
Store leftover Spider’s Nest Cake covered in the refrigerator for up to 3 days to maintain freshness and moisture.
Freezing
You can freeze the cake by wrapping it tightly in plastic and foil. Thaw overnight in the refrigerator before serving to preserve texture and flavor.
Reheating
Spider’s Nest Cake is best served chilled; if needed, let it come to room temperature for 15-20 minutes before enjoying to enhance flavors without melting the decoration.
FAQs
Can I make the Spider’s Nest Cake gluten-free?
Yes, you can substitute all-purpose flour with a gluten-free flour blend suitable for baking to accommodate gluten sensitivities without compromising texture.
Is there a dairy-free option for the cream filling?
Absolutely! Use coconut cream or any other plant-based whipping cream alternatives to keep the filling luscious and allergy-friendly.
How do I pipe the spider’s web strands perfectly?
Use a piping bag with a small round tip and steady hands; practicing on parchment paper helps you develop smooth, even strands before decorating the cake.
Can the Spider’s Nest Cake be made in advance?
Yes, assembling the cake a day prior allows the flavors to meld nicely, just add the spider’s web decoration the day of serving for best results.
What should I do if the cream filling is too runny?
Add a small amount of plant-based texture solution or chill the filling longer before using to help it firm up and hold shape properly.
Final Thoughts
Making a Spider’s Nest Cake might sound fancy, but it’s really a joyful baking adventure that anyone can master. Its unique look and indulgent flavors never fail to impress, whether you serve it at a party or enjoy it quietly at home. Grab your ingredients and give this charming recipe a try—you’ll be amazed at how fun and rewarding it is to create such a delightful dessert!