How to Make Perfect Mummy Cookies Fast
Get ready to impress your Halloween guests with a delightful and spooky treat that’s both quick and easy to make: Mummy Cookies. This fun recipe combines classic cookie flavors with festive mummy-inspired decorations to whip up a batch of irresistibly cute and delicious cookies in minutes. Whether you’re hosting a party or just craving a sweet Halloween snack, these Mummy Cookies bring the perfect blend of crunch, sweetness, and seasonal charm.
Why You’ll Love This Recipe
- Lightning-fast preparation: You can have Halloween-ready cookies on the table in under 30 minutes from start to finish.
- Kid-friendly decorating: Decorating these cookies is a fun activity for all ages, turning baking into a creative celebration.
- Versatile flavors: The basic cookie dough is customizable, allowing you to add your favorite spices or mix-ins.
- Perfect portion size: These bite-sized treats are easy to share, making them ideal for parties or school events.
- Eye-catching design: The mummy wrapping effect stands out, adding a spooky yet adorable touch that guests will love snapping photos of.
Ingredients You’ll Need
Creating these Mummy Cookies is all about keeping things simple but flavorful. Each ingredient plays a key role in balancing taste, texture, and visual appeal.
- All-purpose flour: Provides the structure and tenderness essential for soft yet sturdy cookies.
- Butter: Adds richness and a melt-in-your-mouth texture, making every bite satisfying.
- Sugar: Balances sweetness and helps the cookies brown beautifully during baking.
- Vanilla extract: Enhances flavor depth with its warm, aromatic notes.
- White chocolate or frosting strips: Used to create the signature mummy “wrappings” that give these cookies their festive look.
- Mini chocolate chips or raisins: Perfect for making the mummy’s eyes, adding a contrasting pop of color and flavor.
- Baking powder: Ensures the cookies bake up light and slightly puffy, perfect for decorating.
Variations for Mummy Cookies
Feel free to customize these Mummy Cookies to suit your personal taste or dietary needs. The design is flexible and the dough can easily be adapted.
- Spiced version: Add cinnamon, nutmeg, or pumpkin pie spice to the dough for a warm seasonal twist.
- Gluten-free dough: Substitute with a gluten-free flour blend to make the cookies friendly for gluten-sensitive guests.
- Dark chocolate look: Use melted dark chocolate or dark chocolate chips for the eyes and wrappings for a striking visual contrast.
- Peanut butter cookies: For those who love nutty flavors, make the base cookie with peanut butter and decorate as usual.
- Vegan adaptation: Use coconut oil or vegan butter and a flaxseed egg substitute to make these treats fully plant-based.

How to Make Mummy Cookies
Step 1: Prepare the Cookie Dough
Start by creaming the softened butter and sugar together until fluffy and light. Add vanilla extract and mix well. Then, sift in the flour and baking powder, folding gently until the dough comes together without being crumbly. Chill the dough for 15 minutes to make it easier to handle.
Step 2: Shape the Cookies
Take small portions of the dough and roll them into oval or slightly elongated shapes to resemble a little mummy’s body. Place each shaped dough piece on a baking tray lined with parchment paper, leaving space in between.
Step 3: Bake Until Lightly Golden
Bake the shaped cookies at 350°F (175°C) for 10-12 minutes or until edges are just turning golden. Remove from the oven and allow them to cool completely before decorating.
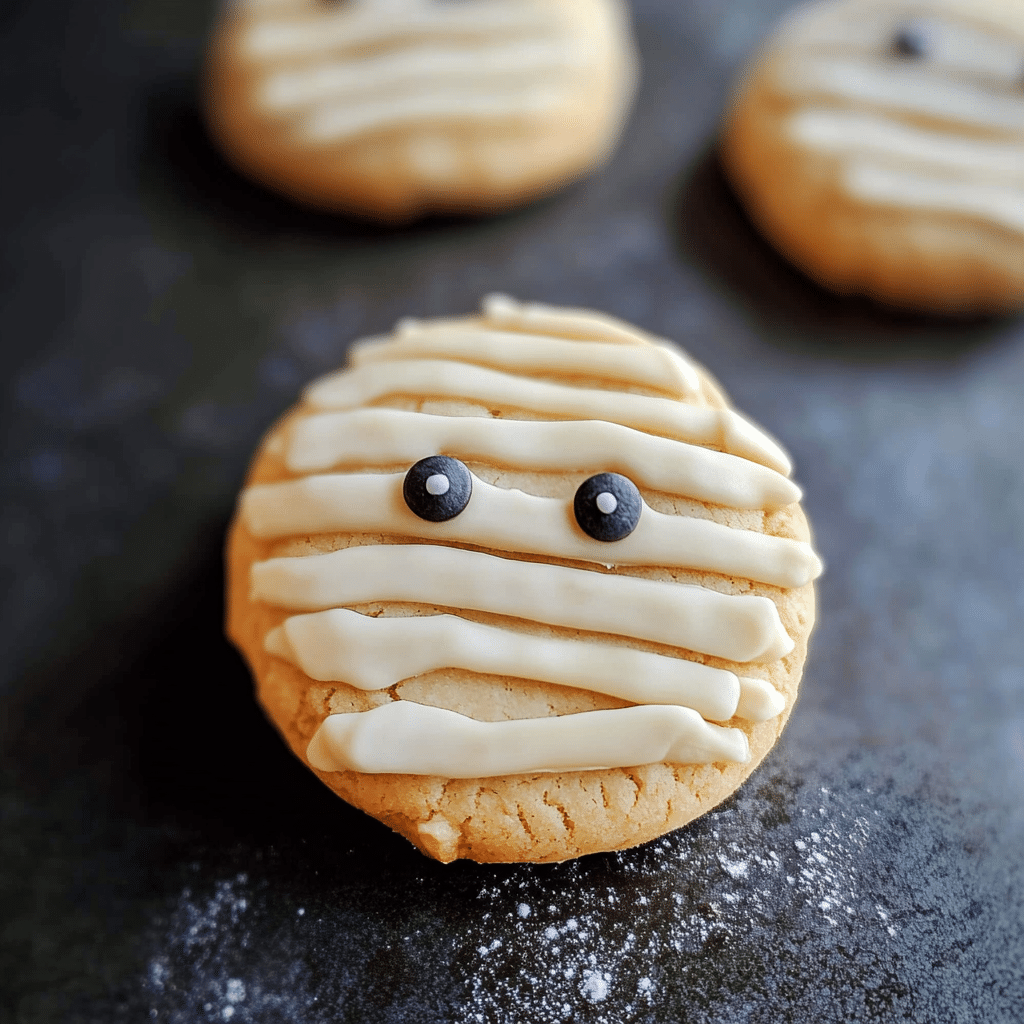
Step 4: Create the Mummy Wrappings
Use melted white chocolate, vanilla frosting, or pre-made icing tubes to pipe thin, overlapping lines across each cookie horizontally, mimicking mummy bandages. Don’t worry about perfection—uneven lines add to the handcrafted charm.
Step 5: Add the Eyes
While the frosting or chocolate is still wet, press two mini chocolate chips or raisins near the top center of each cookie for eyes. Let the icing set completely before serving to ensure the decoration stays intact.
Pro Tips for Making Mummy Cookies
- Use room temperature butter: This helps achieve a smoother dough and fluffier cookies.
- Don’t overcrowd the baking sheet: Give cookies enough space to expand for even baking.
- Pipe frosting carefully: Use a small piping nozzle or a zip-top bag with the tip cut off for precise mummy wrappings.
- Cooling rack is key: Cool cookies on a rack to prevent condensation and sogginess.
- Customize the eyes: Try edible candy eyes or colored chocolate chips for extra Halloween fun.
How to Serve Mummy Cookies
Garnishes
Sprinkle a light dusting of powdered sugar to resemble “ghostly” dust or add a few edible glitter specks to catch the light and elevate the spooky look.
Side Dishes
Serve these with a cold glass of milk, hot cocoa, or a festive pumpkin spice latte to complement the sweet, buttery cookies and embrace the Halloween spirit.
Creative Ways to Present
Arrange the Mummy Cookies standing upright in a decorative cookie jar or attach them individually to sticks for a spooky cookie bouquet centerpiece at your Halloween party.
Make Ahead and Storage
Storing Leftovers
Store leftover Mummy Cookies in an airtight container at room temperature for up to 5 days to keep them fresh and delicious.
Freezing
You can freeze cooled, undecorated cookie dough balls or fully baked and decorated cookies wrapped tightly in plastic wrap and stored in freezer-safe containers for up to 3 months.
Reheating
Allow frozen cookies to thaw completely at room temperature before enjoying. Avoid reheating decorated cookies in the microwave to prevent melting the decorations.
FAQs
Can I use store-bought cookie dough for Mummy Cookies?
Absolutely! Using pre-made dough saves time, just shape and decorate as directed to achieve the mummy look.
What’s the best frosting to use for mummy wrappings?
A simple vanilla buttercream or white chocolate ganache works beautifully because they set firm but remain smooth to pipe fine lines.
How do I prevent the chocolate eyes from sliding off?
Press the chocolate chips or raisins into the frosting while it’s still wet so they stick securely as it dries.
Can these cookies be made gluten-free?
Yes, swapping the all-purpose flour for an equal amount of gluten-free flour blend is a reliable way to make the recipe gluten-free.
Are Mummy Cookies suitable for a large party?
Definitely! This recipe can be easily doubled or tripled, and the decorating step makes a fun group activity for guests.
Final Thoughts
Mummy Cookies are a wonderfully festive and easy-to-make treat that captures the playful spirit of Halloween without any fuss. Whether you’re baking with kids or surprising party guests, these cookies are sure to bring smiles and a touch of sweet spookiness to your celebration. Give this recipe a try and watch your loved ones delight in every bite!